Sorry if has already been posted and I am boring you, but I figured why not.
![Image]()
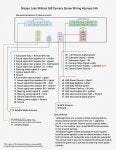
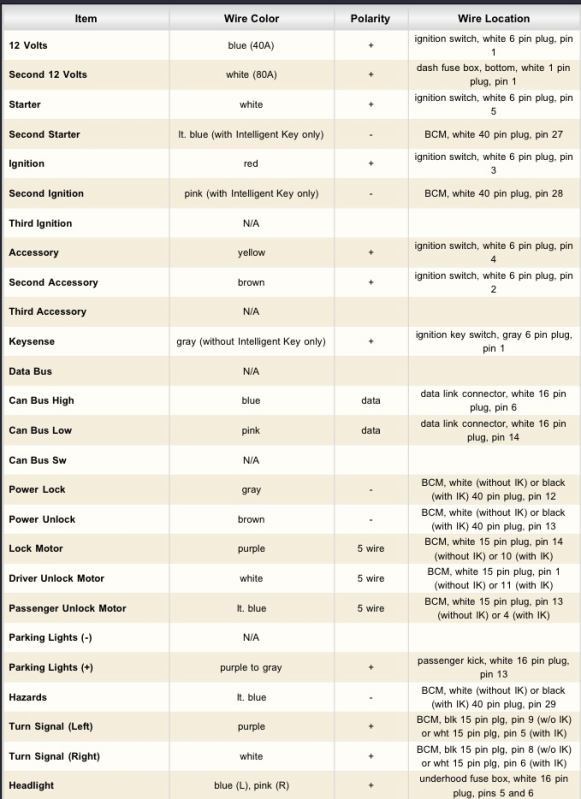
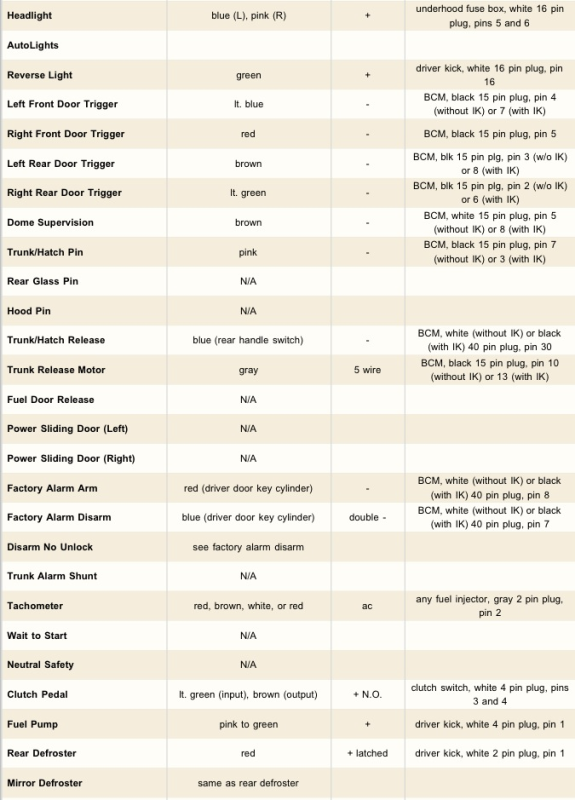
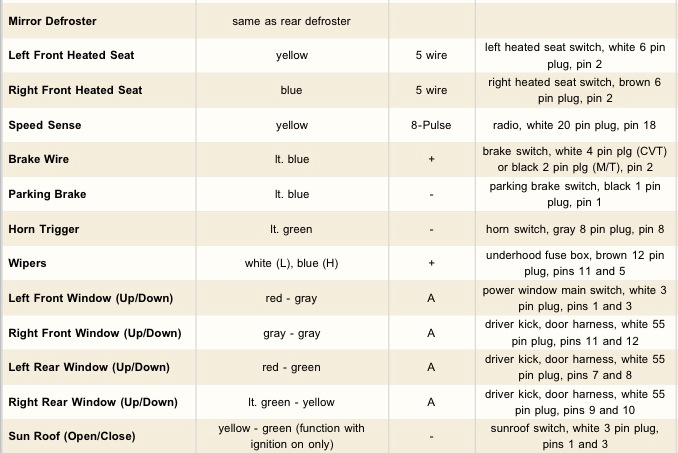
You will be able to click and enlarge. Hope it helps atleast one Juker.
A little more info below. Sorry it is chopped up. Too lazy to type it all out and the tech info does not like any copy/paste/saving type actions.
![Image]()
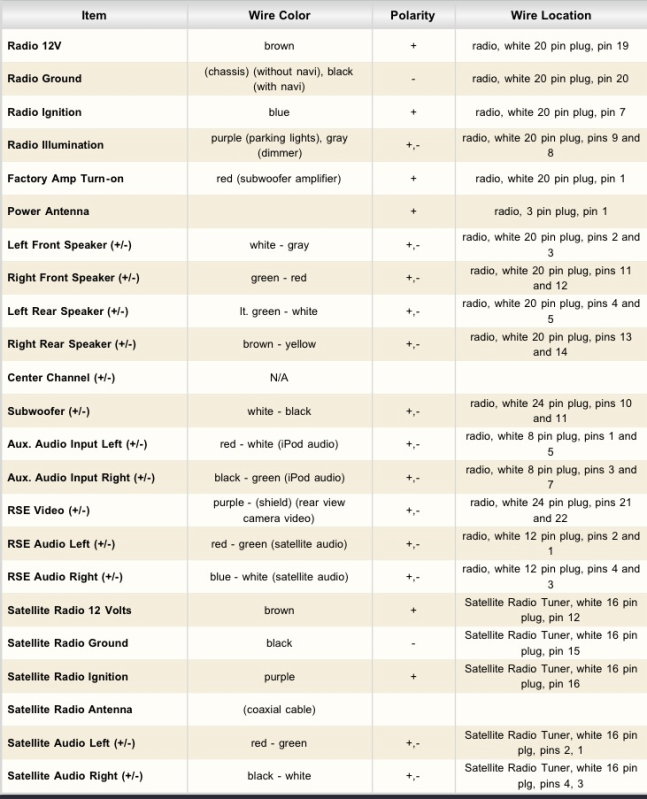
This diagram only applies to 11-14 years, the 15+ models did switch around some wires such as auxiliary audio jack, USB port, video input, etc. If anyone is interested, I'll make another one of these for the 15+ models.
I have struggled to find good wiring diagram information based on the AV system of the Juke. Information regarding retaining the USB port, auxiliary port, factory subwoofer, and reverse camera functionality is hard to come by in a reliable form. I dug up the service manual and did my own installation using its AV wiring information and found it to be completely accurate to my 2013 SV with rockford audio.
I created a simple diagram with all relevant information needed to retain all of these functions with an aftermarket stereo system installation or modify your current installation.
Interesting notes:
The reverse camera requires 6v power applied rather than 12v, I read a facebook post in a juke group that a guy wired up 12v into the camera + power wire and didn't have a problem but I wouldn't recommend this and to use a small and cheap DC DC buck converter to drop to 6v for the reverse camera power terminal.
Baseline and Rockford Fosgate models are both head-unit amplified, not externally amplified thus the door and tweeter speaker wiring terminals are the same. Tweeters are wired in parallel with the front speakers with built-in crossover filter. The factory subwoofer has its own amplifier that can be fed with low-level RCA signal from an aftermarket head unit with full retained function.
Steering wheel control buttons all function via the three different steering wheel wire terminals, others have claimed that the bluetooth module behind the glove box needs to be tapped into to retain the bluetooth control buttons; that is unnecessary.
You will be able to click and enlarge. Hope it helps atleast one Juker.
A little more info below. Sorry it is chopped up. Too lazy to type it all out and the tech info does not like any copy/paste/saving type actions.


This diagram only applies to 11-14 years, the 15+ models did switch around some wires such as auxiliary audio jack, USB port, video input, etc. If anyone is interested, I'll make another one of these for the 15+ models.
I have struggled to find good wiring diagram information based on the AV system of the Juke. Information regarding retaining the USB port, auxiliary port, factory subwoofer, and reverse camera functionality is hard to come by in a reliable form. I dug up the service manual and did my own installation using its AV wiring information and found it to be completely accurate to my 2013 SV with rockford audio.
I created a simple diagram with all relevant information needed to retain all of these functions with an aftermarket stereo system installation or modify your current installation.
Interesting notes:
The reverse camera requires 6v power applied rather than 12v, I read a facebook post in a juke group that a guy wired up 12v into the camera + power wire and didn't have a problem but I wouldn't recommend this and to use a small and cheap DC DC buck converter to drop to 6v for the reverse camera power terminal.
Baseline and Rockford Fosgate models are both head-unit amplified, not externally amplified thus the door and tweeter speaker wiring terminals are the same. Tweeters are wired in parallel with the front speakers with built-in crossover filter. The factory subwoofer has its own amplifier that can be fed with low-level RCA signal from an aftermarket head unit with full retained function.
Steering wheel control buttons all function via the three different steering wheel wire terminals, others have claimed that the bluetooth module behind the glove box needs to be tapped into to retain the bluetooth control buttons; that is unnecessary.